


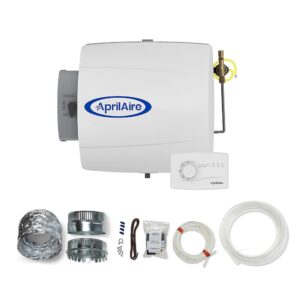
- BUY WITH CONFIDENCE This humidifier was designed and manufactured in the USA by AprilAire – the inventor of the whole home evaporative humidifier, and the leader in indoor air quality solutions
- FULL COVERAGE up to 3,600 square feet in tightly built homes with a capacity of 12 gallons per day
- AUTOMATIC HUMIDIFIER with dual sensors to monitor and respond to both outdoor temperature and indoor relative humidity to deliver optimum humidity 24/7 throughout the home – simply set it and forget it
- CONVENIENT DIGITAL CONTROL shows percent humidity, lights indicate humidifier is running, when to change the Water Panel, when service is needed, and Blower Activation switch sets humidifier to run continually, or only when the furnace runs
- HUMIDITY FOR HEALTH AprilAire Humidifiers can help you maintain optimal humidity in your home of 40% – 60% which has been shown to reduce the incidence of respiratory infections and symptoms related to allergies and asthma by minimizing the formation of bacteria and viruses, fungi, and dust mites. In addition, you’ll feel more comfortable while also preserving items in your home susceptible to damage from changing humidity or dry conditions
7 reviews for AprilAire 500 Whole-House Humidifier, Automatic Compact Furnace Humidifier, Large Capacity Whole-House Humidifier for Homes up to 3,600 Sq. Ft., White
Add a review
Related products
Sale!

Sale!

Sale!
Sale!

Sale!

ecmelara –
[Update] This is a good product. It works well. But note that it’s not easy to install as a DIY. You will also need to purchase other material to complete the plumbing, electrical, and HVAC work. There is also the part of losing the guarantee if you DIY.
This is a great humidifier but it is a lot harder to installed if DIY than the Honeywells you get at the local hardware store. It took me quite some time to figure everything out and get all the components. It doesn’t come with wire so you will need to get wire to wire into the furnace, wire to wire all the low voltage connection, also a drain hose, 1/4 copper pipe, and an electrical box that can fit the transformer. The instructions are good but not that good, videos in YouTube are all different depending on who’s installing it and what HVAC setup they have, but if you follow the directions you will be ok.
The hardest part was figuring out where to installs the transformer. I ended up placing it in the electrical box that held the power switch to my furnace. The box didn’t have any holes (knockout holes) to which I could thread the transformer into so I had to replace the whole switch box. The white wire of the transformer gets attached to the white cable in the box, the black wire of the transformer gets attached to the switch.
You will also need to drill a hole into the wall to be able to install the outside temperature sensor.
I did not use the saddle valve. So I bought a separate valve, 1/2 1/2, 1/4, some pex tubing, and rented a pex crimper to tap into the main hot water line. I had some 1/4 copper tubing for the connection between the valve and the humidifier. It just attaches with compression fittings.
Angelo M. –
Humidifier works great! Installed myself taking my time, I broke the project into 4 phases (days) and about 2 hours planning and picking up what I needed at the store. This is a time consuming project, but if you are comfortable with other home improvements such as adding outlets, lights, switches, fixing pluming, etc…this will be a job you can do yourself.
Phase one I spent about 4 hours mounting the humidifier and bypass ductwork. I purchased 6″ duct from my local home improvement store. I used a 3/8″ drill bit to drill to start an initial hole then used quality tin cutters to cut the square humidifier opening into my plenum and a 6″ round hole for my bypass duct into my cold air return. I already have a set of left, center and right tin cutters, I switched between left/right cutters when appropriate to make clean cuts. I used 3/4″ sheet metal screws with hex heads for everything. I added true metal tape around seams. Metal foil tape is for taping duct work, which is not the same as “ducttape” which is the more common tape everyone thinks of.
Phase 2 I spent about an hour (which hopefully most folks will not have to do) adding a 2 gang metal box at the ceiling above the furnace to mount the 24V transformer (included with the apriaire). I added this to the circuit that powers the furnace. The instrufions tell you not to wire the transformer within the furnace 24v circuits, but it is completely ok and acceptable to wire the 110V transformer to the actual “home” 110V circuit to the furnace. I added a switch in my box so in the summer months I can turn off the transformer when I have the humidifier off. If you are not comfortable with home electrical wiring and you do not have a place to mount your 24V transformer to a 110V source, then plan on either hiring an HVAC or Electrician to add a similar box for your situation.
Phase 3 I spent about an hour running a 1/4″ water line from a hot water source to the Humidifier. The only thing I needed to purchase was 10′ of 1/4″ copper pipe. I used a couple pieces of pipe strap to hold the piping in place for my situation. A flare wrench is necessary to tighten these fittings correctly.
Phase 4 I spent about 3 hours running thermostat wires as instructed in the kit. I used a stepping drill bit to drill the 3/4″ hole needed for the humidistat then mounted the humidistat with two sheet metal screws, as others mentioned you need to use at least 3/4″ long sheet metal screws for this mounting. I used one run of 18-5 thermostat wire to go between the humidistat and the furnace. I also got a really long run of 18-2 thermostat and door bell wire, most of it was for the outside sensor, some was used to connect the transformer, hunidifier water line solenoid and humidistat together.
The system works well. I like the options to be able to let it run on its own or only when the furnace is running. I also like the outside temperature feature, basically you set this humidistat to where you want it and forget it and it will keep the humidity at a level that is no too excessive. If you over humidify your home, you will get water condensation on the windows which you do not want. The humidistat is simple to use and the bright blue display is easy to read. It would be great if it also reported the outside temperature, but it’s only job is to report the relative humidity, which it does.
I was told as a tip to use electrical twist caps at the humidifier water line solenoid and at the outside temperature sensor. These are serviceable parts, by using twist wire caps as apposed to butt connectors or soldering it will made it easier to replace these parts if they were ever to fail.
Update:
I only use the humidifier from about late December through Early March. I was warned last year that if the humidifier is always working you can over humidify the home which encourages mold growth in the duct work.
The home feels warmer inside with the humidifier, even though the thermostat set at the same temperature.
As for the humidifier setting itself, I have it set at 2 for our home. I did initially have it set to 4 which created way too much humidity in our home.
Amazon Customer –
Works as advertised though, even for a seasoned handyman putting this pig in was a real pain, lots of conflicting information on bypass settings, wiring this smart one can give you a REAL HEADACHE and getting the holes cut right isn’t for the feint of heart.
I got it done and working though, and operationally it’s 10/10 good product.
Marley981 –
It has worked flawlessly this winter. As others have stated I wouldn’t take on this as a DIY unless you have electrical and fix-it experience. Read all that you can about the installation and how to hook it up properly to your furnace and that you have the manual and wiring diagrams for it just to be safe. The cost was around $70 for the parts. I used a putty for insulation to seal the frame to the HVAC duct. I used a lot of 3M duct tape, it’s the stuff that is shiny with red 3M all over it. Annoying and smelly but works well. Cutting the sheet metal was annoying as well because you have to go slow and need to cut in the right direction with the shears to keep the bolt side away from the metal bending. Also, make sure you know where the plenum is on your furnace as mine was sitting much higher than I thought so I had to cover the hole I had made and mount it on another side. The information on the furnace was terrible and Armstrong had no ideas beside sending the manual I already had to me. It doesn’t show how high it goes into the duct because of a poor image shown. I used a clear tube as others have suggested from the humidifier to the PVC drain tube so that I can make sure it’s working without having to lean down near the drain to hear the trickle of water. I’ve never worked with hard copper lines, easy to strip but then easy to snap off too. I used a braided fridge line as it just screws onto the water vampire tap and connector to the humidifier.
My only complaint is that the relative humidity sensor is on the back of the display unit. I wanted to have the sensor mounted on the HVAC duct and then the display upstairs next to my thermostat. It turns out to be OK as it’s the auto version and the blue LED stays on all of the time and it’s bright. It just would be nice to see if it needs to be adjusted if something is out of whack. I would have liked to see a humidity percentage on the dial instead of just a number but I’m sure that’s because of the variability of the humidity to get the proper balance of outside and inside with the outdoor sensor. The item is light and well packed and very basic so no complaints there.
I have a 1,500 sq/ft house and it does a fine job so that I don’t shock the hell out of my cats and the lining of my nose feels non-dry again. The house is not air tight and some of the tall windows next to the sliders are popped so it is good that it still works well on setting 6. The level was around 30% when it was crazy cold out this year in Ohio. Anyway, I hope this helps a little…
Jian –
When I opened the package I saw everything that should be included in the box. So I read the section of unincluded items in the instruction and went to local hardware store to get all the parts needed. After getting everything I started the project. Cut the hole on the plenum then I opened the humidifier. Only then I saw the whole installation kit inside the humidifier! What a good surprise! So I ended up returning everything (except for the water supply line as the one in the installation kit is too short). Two trips to the local hardware store but it’s worth it… Saved me 100 bucks. After this, I went to the product page again and didn’t find any mentioning of the included installation kit. Maybe a few words like installation kid included should be added in the description. But at the end of the day, the product works great, so I’m giving it 5 starts.
Frost –
I made the mistake of ordering the version with the digital thermostat. It’s nuts! Do not order the digital thermostat version! The wiring for this thermostat is like 12 different wires plus an outdoor sensor you need to drill through the house and run the wire to it. Than the crazy wiring within your furnace. Good luck to you wiring this thing up. I ended up just throwing the digital thermostat in the garbage and just use my existing mechanical one with two wires. I attached the Humidifier directly to my two wires coming out of my furnace (no transformer) and everything works fine. If you have a modern furnace (last 20 years) you do NOT need to wire the transformer in. Your furnace already supplies 24Volts.
Amazon Customer –
We had our plumber install this humidifier on our furnace and it is working well, keeping the house humidity between 30 and 50 on the “furnace” setting. We can also put it on the “fan” setting and have it run if the furnace isn’t.