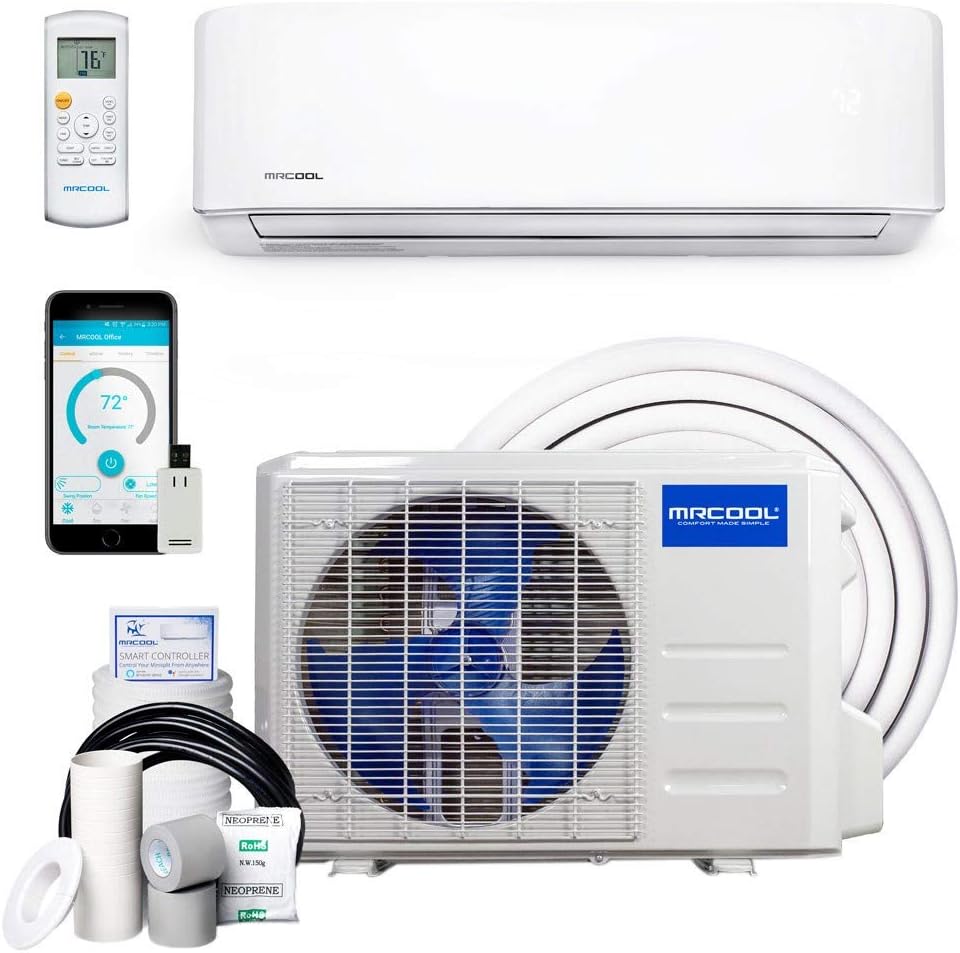
24k BTU 17 SEER MrCool Advantage Ductless Heat Pump Split System 3rd Generation – 230v
$1,679.99
- 220V power required
- 16 ft installation kit included.
- 1 year compressor, 2 year parts warranty
- Remote included
- WiFi Smart Kit included
Last updated on Details
Category: Split-System Air Conditioners
Related products
Split-System Air Conditioners
Split-System Air Conditioners
17.4 SEER2 MrCool Hyper Heat Central Ducted Split System with 10 Year Labor Warranty (3 Ton)
Rated 5.00 out of 5
$3,254,003,254.00



Scott W. –
Was needing to fix the Furnace inside the church we bought to make it a home, was told about this and it would be cheaper, we did our research and decided to go with this, and we were right, going to buy another smaller one for the back room.
Bluejay –
I bought this thinking that I was getting the DIY system , but it is not.
I’m having trouble getting a professional out to my home to finish the installation.
Make SURE you get the DIY system!!!!!!!!!
It is installed and working GREAT. Nice and quiet.
Mr Jinx –
It’s summer in SW Florida and I had this unit installed in my garage that would get to around 100 degrees every day. It wouldn’t even cool under 78 at night. It was so hot in there I couldn’t even work on my motorcycles. My garage is perfectly cool now with this unit. It’s not even working hard. I bought the unit and my AC guy installed it. He said it was under-charged so he charged it completely. I’m very happy with this unit.
Roger McMinn –
Me and my mate put it in over two days … the hard part was putting up the inside unit. The outside unit was easy to install. I DO WARN you if you do not have a person you know to help vacuum the lines down, most companies will not touch it as it is not one they installed. SO, either know someone or get a vacuum pump.
Tech review –
This unit so far is super quiet and works well. Time will tell, but the unit seems like reasonable quality. I installed this unit myself (I am certified) and only thing I noticed was the mounting directions were slightly off. The quality of the supplied line set and other components were better decent. For instance there was springs on the indoor unit lines for easier bending. I have installed several LG units that did not have this small feature which helps make it a little easier to bend the lines.
Scott W. –
Update 1/11/21:
Changing rating to 4 stars from 5.
Heating is not nearly as efficient as cooling. Here in the Autin area it sometimes drops to the 30s and rarely to the 20s.
I’ve noticed that when the temp falls below 40F it struggles to maintain 68 degrees in the garage.
The garage has insulated doors with heated rooms above and on two sides.
Yesterday, I noticed it went into defrost at least three times.
All-in-all I am still happy, but I had hoped the heating function would have been a little better.
Update 10/14: This thing is still going strong. Has run almost every day since June.
This thing is awesome!!! Why did I wait so long?
Quite as a mouse. Colder than a few hearts I know.
Why I chose the Advantage unit over the DIY – Simply because you can’t trim the line-set on the DIY. I called MR. Cool and told them I couldn’t live with a bunch of coiled AC lines laying on the ground. They suggested the Advantage series. As long as you are comfortable cutting copper line, flaring copper line, running a vacuum and looking at a gauge, then you are set. There are a million YouTube videos showing you how to do it. The unit came with 16 feet of line-set and I only used 50 inches of it.
I bought all parts on Amazon except for the conduit, main breaker, and 10 gauge power cable to the disconnect. I also had to purchase a short piece of 3.5″ PVC as the supplied sleave for the line-set was too short for my wall.
Below are the extra items I purchased on Amazon:
3.5″ hole saw for brick – tip – rent a nice roto hammer if you need to go through brick and don’t own one. – https://www.amazon.com/gp/product/B07ZSRTFJH/ref=ppx_yo_dt_b_asin_title_o05_s00?ie=UTF8&psc=1
Power Whip
https://www.amazon.com/gp/product/B0756N989G/ref=ppx_yo_dt_b_asin_title_o07_s00?ie=UTF8&psc=1
Disconnect –
https://www.amazon.com/gp/product/B000LF42NK/ref=ppx_yo_dt_b_asin_title_o08_s00?ie=UTF8&psc=1
410a Valve Core removal tool – I did not like this tool. Poor quality but ended up working
https://www.amazon.com/gp/product/B07MCWMQ97/ref=ppx_yo_dt_b_asin_title_o09_s00?ie=UTF8&psc=1
Line-set cover –
https://www.amazon.com/gp/product/B07SPL5RZD/ref=ppx_yo_dt_b_asin_title_o00_s00?ie=UTF8&psc=1
Nylog –
https://www.amazon.com/gp/product/B008HOSQQQ/ref=ppx_yo_dt_b_asin_title_o01_s00?ie=UTF8&psc=1
Wall Mount for outdoor unit –
https://www.amazon.com/gp/product/B00LDU9R2I/ref=ppx_yo_dt_b_asin_title_o02_s00?ie=UTF8&psc=1
Delivery – Why buy at a big box hardware store when Amazon delivers to your door?
Came on a lift-gate truck and they delivered it inside the garage. They took it off the pallet and took the pallet with them (which I preferred). The driver was extremely polite.
Communication – They (the transport company) kept calling the number on the order, which was not my number. It was an Amazon number in San Antonio. I contacted the seller prior so I had the shipper number. I called the transport company and made arrangements for delivery. I gave them my direct number. However, the driver still had only the Amazon number. Luckily, he called dispatch and they texted me that he was on the way. Could have had the unit on Friday, but got it Monday. Regardless, I was fine with that.
Lesson learned – contact the seller and get the transport company contact info and call them.
Installation instructions –
The manuals are written by someone who speaks English as a secondary language. Spell and grammar check were definitely not used on the install manual. I bought the 24K unit, but the manual is the same for all of them. On page 12 (fig 4.3) there is an itsey-bitsey, teeny-tiny diagram which is needed to mount the indoor unit bracket and locate the center of the hole needed for the line-set. I went online and downloaded the manual in PDF, blew up the diagram and printed it out full page. Note – there is no template with the Advantage Series.
The diagram indicates that the vertical center-line for the hole is 151 mm from the center of the right leg of the bracket. There are no reference marks on the bracket to measure from. HOWEVER!!, there is stamped into the metal instructions to measure 120 mm from bracket edge to locate the center-line. So that is what I did.
I then went to check my work and measured 151 mm from the center-line I just drew back to the bracket. It came no where near the center of the bracket. So I called tech support for a warm-and-fuzzy. He said to measure about 5 or so inches from edge of bracket. Since the diagram requires you to calculate the outside edge of the unit and then measure from this imaginary line, I asked him about the horizontal center-line for the hole using the bracket as the reference point and he said about an inch up from the bottom of the bracket. Since the hole is 3.5″ in diameter I already knew I needed to be 1.75″ up from the bottom of the bracket. I politely said goodbye and figured it out on my own.
I prefer to work in metric since it is so much easier, but here are the measurements I ended up using to lovcate the center of the hole I needed to drill. 120mm (4.72 in) from bracket right edge for vertical center-line, and 45 mm (1.8 in) from bottom of bracket up for horizontal line. The cross-hair gives the center of the hole. Note: There are other options for the line-set. I chose to have the line-set leave the right rear of the unit.
Speaking of measurements – The outdoor unit mounting measurements are in goofy fractions. For instance, 21.26 inches and 350.52 mm. Really? I can’t imagine needing to be within 1/100th of a mm to mount a unit. This was more of an annoyance than anything else.
Anyway. My point is to take the instructions with a grain of salt. Do your own measurements and math and you will be fine.
To the fun part – What can I say? This thing rocks! I was tempted to sleep in the garage last night.
Difficulty rating is a “6” on a scale of 1 to 10; Even with the ambiguity of the install manual.
The longest part of the process was drilling the hole. I spent 3 hours studying the measurements and also drilling the hole. This also included making sure everything lined up perfectly outside outside. I had the line-set come out perfectly centered between the outside unit and the disconnect.
Spent one hour running power. This included the disconnect
45 minutes prepping and hanging inside unit. (after getting bracket hung.. See “hole” above).
45 minutes hanging outside unit on wall.
3 hours making all connections, including trimming line-set and vacuuming system.
This was a long review, but I hope this helps someone make a decision. I’m happy with my purchase.
Cesar –
Purchased 24KBtu unit for a 14×65 2Br Mobile Home. Relatively straightforward installation, but not for everyone. I made a dumb mistake in wiring between the indoor unit and outdoor, resulting in an error that wasn’t described in the otherwise good documentation. Tried to call the vendor, left a message, but never heard back. I did find the answer to my problem on the vendor’s website, and the issue was easily fixed. Purchased a vacuum pump, gauges, and line set covers from Amazon to complete the project.
It has worked great since I rectified my wiring mistake. It’s only been in heat mode (Jan in NC), and generates impressive heat and airflow at next to zero noise. The condenser unit outside is also very quiet. Time will tell on the reliability and efficiency, but everything I’ve seen thus far makes me optimistic.
Norma Lee Rogers –
Liked everything. This unit is so quiet you think it’s off. The inside unit is quite and throws cold air quickly and cools my room so fast. The unit outside is extremely quiet. I can control it with my phone from anywhere in my house. It also brings a remote control. I recommend this Mr. Cool AC.