

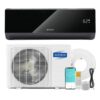

- Smart Cooling: Control your Muse AC even when you’re out of the house with the Gree+ app and enjoy a cool breeze upon arriving home on a hot day. Plus, with voice control through Alexa or Google Assistant, changing the settings is a breeze.
- Efficiency Meets Savings: With a SEER2 rating above 20, the new Muse Series is built to be energy efficient, saving you up to 62 Percent on energy costs compared to low-SEER2 units. The higher the SEER2 rating, the more efficient your unit is, making the Muse Series a smart and cost-effective choice for your home cooling and heating.
- Advanced Compressor: The upgraded compressor in the Muse Series provides stable performance under extreme weather conditions. Enjoy powerful cooling in summer with a max operating temperature of 122 Degree F or stay warm in winter with a minimum operating temperature of -13 Degree F.
- Upgraded Package: TOSOT has upgraded the Muse’s package to ensure safe delivery and protect against heavy shocks and crashes during shipping, ensuring your package arrives in condition.
- Noiseless Night: With operating noise between 24dB and 34dB, the Muse Series provides a peaceful night’s sleep. Activate sleep mode to ensure the temperature stays comfortable throughout the night.
5 reviews for TOSOT 18,000 BTU Mini-Split Air Conditioner, Wifi Enabled Ductless Inverter Split System AC Unit Heating System, Compatible with Alexa – 20 SEER2 230V
Add a review
Related products
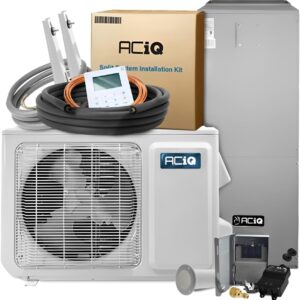
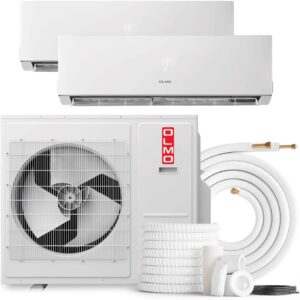
Split-System Air Conditioners
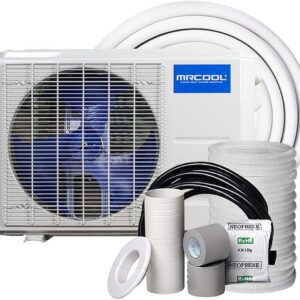
Split-System Air Conditioners
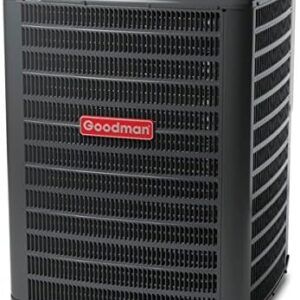
12k BTU 19 SEER MrCool Advantage Ductless Heat Pump Split System 3rd Generation – 115v
Split-System Air Conditioners
$1,986.00
MichaelP –
I like doing projects around the house. But I am in no way a pro. I found this install to be pretty straight forward but challenging. I followed the instructions as best I could. As usual, the instructions leave a lot to be desired. But after watching a few YouTube videos I put the whole thing together without much trouble.
I wanted to mount the condenser on the outside wall but was afraid of hearing it rumble. It is so quiet that a wall mount would not have been a problem. The exhaust fan is louder than the compressor.
I had an electrician install the disconnect where I needed it. I connected the line set and wiring to the inside unit and pushed them and the drain hose through the 3” hole I had drilled. My wife stood outside and guided the copper lines while I hung the inside unit on the wall. The instructions said to wrap all the lines together beforehand, but I just did a small section. I figured it would be easier to avoid kinking the lines if they were still separate. I gently pushed and bent the lines toward the path I determined they needed to go. Connected them to the compressor and pulled a vacuum on them. The cheap vacuum pump I ordered from Amazon worked great. I did order adaptors that were advertised to be specifically for a mini split. After removing the pump, releasing the freon and connecting the wiring it was time to test the unit. At first, I was sure there was something wrong. The lights and fan were on, but it didn’t seem cold. Before I panicked, I gave it a few minutes, and everything worked perfectly. I am very pleased with this unit. Go slow, read the directions a hundred times and watch YouTube. You can do this.
just me –
When remodeling a 1903 home, we needed a source of cool air. Adding a central air unit was going to cost $13,000. Instead we went with this mini-split. There were great instructions on you-tube and my husband and I were able to install most of the unit ourselves. We did need an electrician to run the electrical to the unit which cost us $350. The hardest part was drilling through the homes wall to run the hoses connecting the inside unit to the outside unit. The unit works beautifully, is quite, not unattractive, is up out of the way and much cheaper than our previous options. I would recommend if you have a two story home you put one up and one down. Very happy with this product.
Gary Nelson –
This is my first time installing a mini split. I’m a home builder and like to do projects on my own for my personal house. I purchased this for my pole barn. Install went well and wanted to leave some tips for some one purchasing this. To do this right, you will need a metric flange tool set, grabbed a full set that does metric and standard for under $100, an adapter for vacuum pump when done, pipe benders, Nd proper sealant for nuts. Install took me about 6 hours total and thing runs great and super quiet!
Gary Nelson –
This is a great little unit once I got all the pieces and got it installed. The first delivery came with only the indoor unit and omitted the condensing unit. I had to return the indoor unit and reorder delaying me for weeks. I installed the unit over three partial days. Because it is 120 Volts and only pulls about 12 amps, I was able to tie it in to an existing lighting circuit. This unit is of good quality but the instructions are only fair. That is completely remedied by a great You tube video from LRN2DIY.com. He does a complete install with detailed instructions. This unit is not really designed for DIY so you have to have a vacuum pump and gauges. This equipment is available on Amazon for less than $200 and the video from LRN2DIY shows you how to do it and makes it really easy. I would buy this unit again!
Amazon Customer –
I bought a 12,000 BTU for the kitchen/office and then a 9,000 BTU unit for the bedroom, they were easy to install, and have been working silently and perfectly for heat and cool.
I just ordered a 3rd one last night, 9,000 BTU for the front room.
You DO need a few things to install these yourself but they are half the price of the “mr cool” units so you still save a few hundred bucks.
You will need;
A Vacuum pump with gage set (about $100)
An open end torque wrench (about $50)
A hose adaptor for connecting the vac pump (about $8)
Nylog sealant (about $13)
Here is what I bought to use;
VIVOHOME 110V 1/4 HP 3.5CFM Single Stage Rotary Vane Air Vacuum Pump and AC Manifold Gauge Set
VANPO Adjustable Torque Wrench, 5-45 Ft.lb/7-61 Nm, 38MM Open End Torque Wrench, 3/8 Inch Drive Torque Wrench with Interchangeable Jaw & Ratchet Head for HVAC
R410a Charging Vacuum Port Adapter Brass Converter with Thimble 5/16 Inch Female Quick Coupler to 1/4 Inch Male Flare for Mini Split System Air Conditioner HVAC Refrigeration Service
RT201B Nylog Gasket/Thread Sealant, 30 ml (1 Pack)
If you are doing the wiring yourself like I did- you need a 12/2 with ground copper cable, a disconnect box and a breaker.
After installing the head unit indoors and the condensor outside you connect the copper linesets, drain hose and communication cable which come out thru the wall from the head unit to the condensor, use a small amount of the Nylog sealant just on the copper flares’ seating surface NOT on the screw threads.
I used a short piece of 3″ PVC drain pipe to cleanly go thru the wall.
After connecting the linesets you need to torque the flare nuts on them to the specs in the manual, this is a VERY important step- too loose or too tight can cause leaks, get that tight to the specs and you won’t have a leak problem.
You need to connect the vaccum pump to the service port using the adaptor as the hoses are different, there are videos showing how on youtube, it’s easy enough, let the pump run, a half hour is fine, close the service port valve and then shut the pump off and remove it.
Now you use an allen wrench to open the two valves on the condensor’s brass fittings, and the refrigerant enters the lines, now it’s ready to go! The instruction booklet helps, youtube videos will help get it done easily- just make sure not to kink the copper lines, unroll and flex them gently into shape and position, TORQUE the fittings correctly, vacuum pump a half hour, and it’s done, very simple.
So I spent about $175 for the pump, adaptor etc but I used it for 2 units and now will be using it for a 3rd, so it’s more cost effective divided over multiple units- even buying those to install one unit is a lot cheaper than mr cool which wants around $1299 and that still demands you use a torque wrench to tighten the flare nuts.
For youtube videos search for these excellent general guides on a few types of these units such as mr cool and others, ( Tosot also has a youtube video on the exact product too which is also helpful)
How To Vacuum Down a Mini Split with Analog Manifold Gauges
This MINI-Split AC System Changed My Life | Learn How To Install One Yourself
How To Install a Mini Split Line Set – R410a Flaring Guide & Torque Settings Using Nylog
One thing to keep in mind is, ALL of these mini splits are basically the same other than slight cosmetic differences- they are manufactured by Gree global corporation at the same plant regardless of “brand” name slapped on the outside.
According to the Nikkei newspaper, Gree’s global market share of residential air conditioners reached 20.6% in 2018, ranking No.1 in the world for 14 years.
Gree has established 126 research institutions, 1,045 laboratories, 1 academician workstation (motor and control), one national key laboratory, one national engineering research center, one national industrial design center, one national recognized enterprise technology center, and one robotics engineering technology research center.
So, these Tosot units should give years of dependable service, and the manufacturer is well established with a long record of many types of appliances and industrial units.