- Smart Cooling: Control your Muse AC remotely using the Gree+ app, allowing you to adjust settings and enjoy a cool home before you even arrive. Compatible with Alexa and Google Assistant for voice control convenience.
- Efficiency Meets Savings: The Muse Series boasts a SEER2 rating above 20, ensuring energy efficiency that can save up to 62% on energy costs compared to lower SEER2 units. Opt for higher SEER2 ratings for smarter, cost-effective home cooling and heating solutions.
- Advanced Compressor: Upgraded compressor technology ensures stable performance in extreme weather conditions. Experience powerful cooling with a maximum operating temperature of 122°F or reliable warmth with a minimum operating temperature of -13°F.
- Upgraded Packaging: Enhanced packaging for the Muse Series guarantees secure delivery and protects against impact during shipping, ensuring your product arrives in pristine condition.
- Noiseless Operation: Operating at 24dB to 34dB, the Muse Series ensures a quiet environment conducive to a restful night’s sleep. Activate sleep mode for consistent comfort throughout the night.
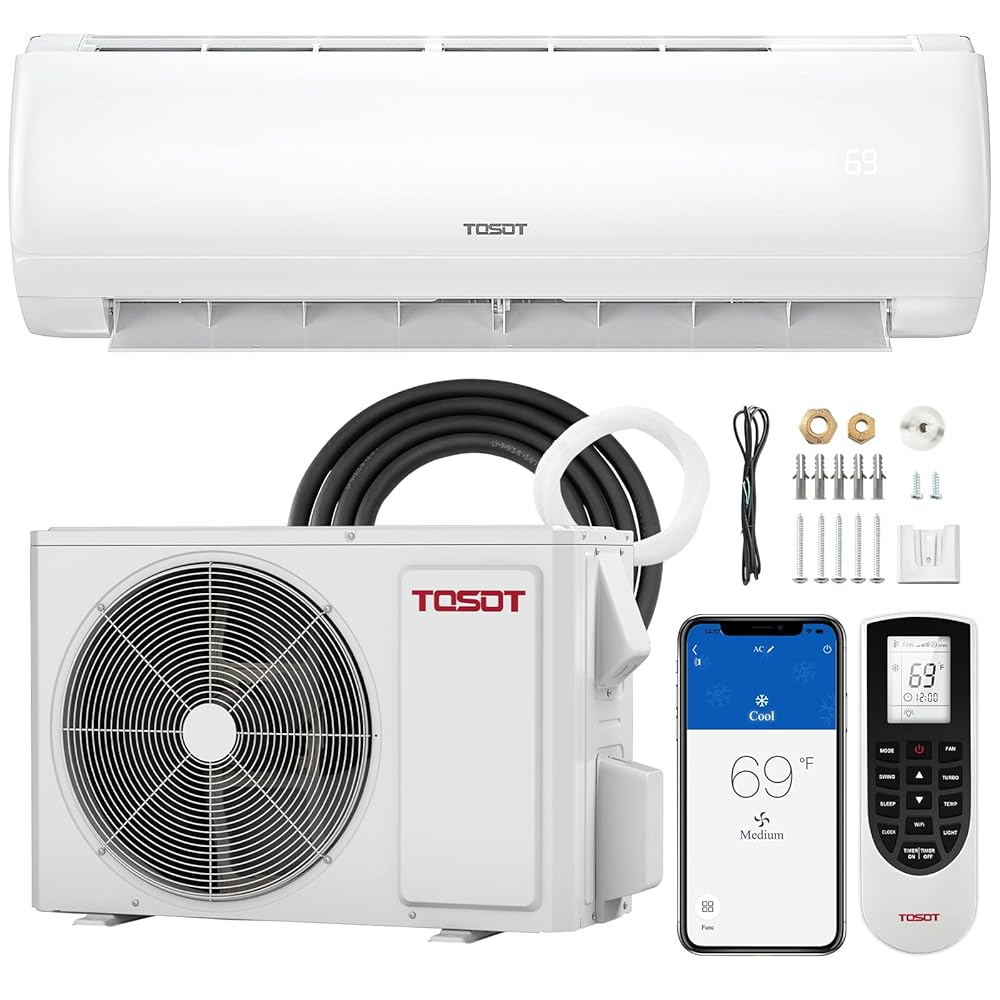
TOSOT 24,000 BTU Mini Split Air Conditioner, WiFi Enabled Ductless Inverter AC Unit Heating System, Compatible with Alexa-22 SEER2 230V, White
$1,399.00 Original price was: $1,399.00.$1,299.00Current price is: $1,299.00.
Last updated on Details
Category: Top Room Air Conditioners
| Product Dimensions | 44.45 x 16.06 x 13.34 inches |
|---|---|
| Item Weight | 123.2 pounds |
| Manufacturer | Gree Electric Appliances, Inc. of Zhuhai |
| Item model number | 24,000 BTU Mini Split Air Conditioner |
| Form Factor | Mini-Split |
| Warranty Description | 5-year warranty |
| Batteries required | No |
| Included Components | Mini-Split Air Conditioner |
| Capacity | 1.5 Tons |
| Voltage | 230 Volts |
| Noise Level | 24 dB |
8 reviews for TOSOT 24,000 BTU Mini Split Air Conditioner, WiFi Enabled Ductless Inverter AC Unit Heating System, Compatible with Alexa-22 SEER2 230V, White
Add a review Cancel reply
Related products
Sale!
Top Room Air Conditioners
Rated 5.00 out of 5
Sale!
Top Room Air Conditioners
Rated 4.38 out of 5
Sale!
Top Room Air Conditioners
Rated 4.75 out of 5




Tac EMS –
These work great and are reasonably priced. Quiet? You can’t hear them run, indoors or out. Great AC alternative. Yes you can install them yourself, the hole in the wall is just over 1 inch. There is enough Freon in the compressor you don’t need more.
Gary Nelson –
Like everyone else, I looked into doing this myself. I did with some help from an electrician friend. The installation is straight forward, but you REALLY need to adhere to the electrical requirements before you do anything. This does require some knowledge of how your electrical panel is setup. This unit works great both for cooling and heating (to a degree) a two car garage with an insulated door in middle TN.
Tac EMS –
Easy installation, the fittings went together right and the vacuum of system was passed on both systems that I purchased. Keeping room cool even set to 80, cools a room in minutes, can’t even hear the blower on the inside, unless you turn on the turbo option, outside unit fan is quite and hardly any vibration, so mounting on the wall or ground is open to preference and location. If you DIY this , you will need a vacuum pump and a set of gages, some sets come with the adapter for the mini split port. Just FYI I got a vacuum pump with gages and it came with 3 adapters , the one that was correct was the one that screwed on all the way to the base. The other 2 screwed on but only half way , not depressing the valve causing vacuum read issues. Another tip , absolutely get the drain angle correct or you will have water 💧 issues. Depending on your location. One more , pull back the fitting nut and expose the flange, line that flange to the surface of the other fitting, then bring the nut down and titan. Great units , cools fast and effectively.
Gary Nelson –
Easy install. Works like the more expensive models. Love it
David H –
Overall a good experience. I put it in my two car garage for when I’m out there working on various projects all year around. So far it’s working well. Just follow the myriad online instructions and YouTube examples and you’ll be fine. I definitely recommend using nylog blue on the flares.
My only real complaint is that the smaller 1/4 inch line that it comes with is actually just a bit smaller than 1/4in. This was a big problem for me and added several extra hours of frustration: the factory flares were actually of good quality but if you try to torque the 1/4 flairs to the correct spec, the tubing wall will become too thin at the fitting and the line will break. Then you’ll have to cut it off and re-flare the end. However, given that the tube is smaller than standard, it will not stay tight in the flaring tool, will slip, and you’ll get a poor flare. I ended up wrapping several layers of painters tape around the tube to make it thick enough to grip but even that barely worked and honestly I should have just went out and bought a new length of copper tubing that was actually 1/4 inch and swapped that into the line insulation. So, just be aware. In the end I abandoned the “correct” torque spec, just hand tightened to “snug” (while using the nylog), and didn’t have leaks. Had no issues with the 3/8 copper line as it was actually the correct size.
MichaelP –
I like doing projects around the house. But I am in no way a pro. I found this install to be pretty straight forward but challenging. I followed the instructions as best I could. As usual, the instructions leave a lot to be desired. But after watching a few YouTube videos I put the whole thing together without much trouble.
I wanted to mount the condenser on the outside wall but was afraid of hearing it rumble. It is so quiet that a wall mount would not have been a problem. The exhaust fan is louder than the compressor.
I had an electrician install the disconnect where I needed it. I connected the line set and wiring to the inside unit and pushed them and the drain hose through the 3” hole I had drilled. My wife stood outside and guided the copper lines while I hung the inside unit on the wall. The instructions said to wrap all the lines together beforehand, but I just did a small section. I figured it would be easier to avoid kinking the lines if they were still separate. I gently pushed and bent the lines toward the path I determined they needed to go. Connected them to the compressor and pulled a vacuum on them. The cheap vacuum pump I ordered from Amazon worked great. I did order adaptors that were advertised to be specifically for a mini split. After removing the pump, releasing the freon and connecting the wiring it was time to test the unit. At first, I was sure there was something wrong. The lights and fan were on, but it didn’t seem cold. Before I panicked, I gave it a few minutes, and everything worked perfectly. I am very pleased with this unit. Go slow, read the directions a hundred times and watch YouTube. You can do this.
Chris –
The length and amount of tubing in the description is not what was sent. Supposed to be 16 feet (5m) – it was shorted by 40 inches (1 meters)t on ALL THREE systems I ordered. This posed a problem when planning a second floor install and where to put the outdoor unit. It had to go up higher on the building than desired. Also, the tubing is in METRIC- but they discuss it in inches. If you need to flare an end, this can cause problems. Customer service is very nice but with all of the other companies out there, there are better choices at better prices.
TimNaples –
This is my first time installing a mini split. I’m a home builder and like to do projects on my own for my personal house. I purchased this for my pole barn. Install went well and wanted to leave some tips for some one purchasing this. To do this right, you will need a metric flange tool set, grabbed a full set that does metric and standard for under $100, an adapter for vacuum pump when done, pipe benders, Nd proper sealant for nuts. Install took me about 6 hours total and thing runs great and super quiet!