


- EPA-certified nonelectric pellet stove utilizes a Natural gravity feed system, for less maintenance
- 40,000 BTUs heats up to 2,000 sq. Ft
- Uses standard 3-inch pellet venting
- 60-Pound Hopper lasts for up to 30 hours
- Silent operation and Modern Style
- Material Type: Steel
3 reviews for US Stove Company US GW1949 Wiseway Non-Electric Pellet Stove, 60 lbs Hopper, Black
Add a review
Related products
Sale!
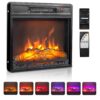
Stoves & Fireplaces
Sale!

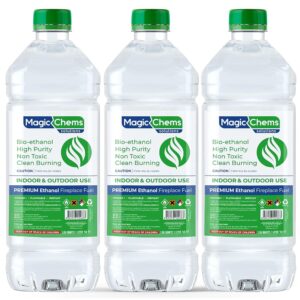
Stoves & Fireplaces
Sale!
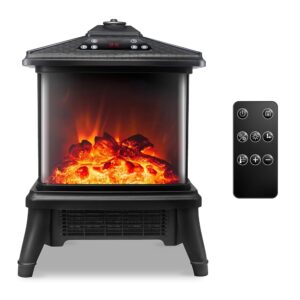
Stoves & Fireplaces

Sale!
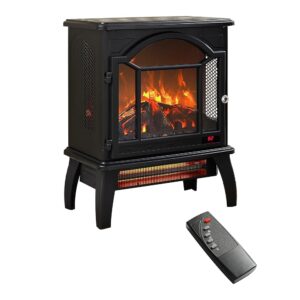
Stoves & Fireplaces
Nicki –
I live off-grid and wanted this stove since it doesn’t require electricity. It doesn’t work properly. I wake up to a cold house, with the thermometer reading 100 on the stove. It should maintain 300 to 400 with my dry pellets. It also builds up creosote in the chamber that drops pellets making it nearly impossible to pull out the tube with the burn basket. (look closely at the pic, one of the solder joints was cracked on arrival too ). Ash builds up in the basket and I have to use a butter knife to poke at it every 2 hours or it will stop burning. I wanted this stove to work…I threw $1500 down the drain. I am very disappointed. I hope the US STove company will replace it with another model.
**UPDATE** USStove replaced the burn basket. The stove works much differently now. It still needs to be maintained as the ash clogs in the basket. Do NOT us hardwood pellets as they clog the basket, use only softwood pellets for a hotter burn and they fall through the burn basket better. I would give this product now 3 or 4 stars. This stove does not heat 2000 sq. ft but will heat up to 1000 comfortably. It is a machine that you have to learn to maintain for optimal performance.
Nicki –
Update 11/29/2019
Started having real issues with smoke coming out of the fuel preheat chamber. The area between the hopper and the burn basket.
Today the stove couldn’t get the chimney thermometer above 300 even with the hot burning Red Fir pellets. It could only raise the temp in the yurt from 15F to 57F (-10C to 10C), and smoked the place out so badly I had to keep opening the door to air the yurt out. Nothing I did helped stop the smoke from backing up the burn basket towards the hopper.
Hauled the stove outside and gave it a thorough washing with hot soapy water from the chimney pipe down, but just didn’t see much soot coming out.
While drying the path for the pellets, specifically where the pellets sit above the burn basket, I turned my hand up and was surprised.
The 4” space above the burn basket (place circled in yellow) to just below where the pellets start the straight drop down was PACKED with clinker like carbon. +50% of that space was clogged almost the entire 4” of that space.
With a two inch by half inch piece of scrap metal I was able to scrape open up that square tube so it was a good 85% clear up and around. It took a good half hour.
It’s a really awkward place to get your meat hooks into, and the carbon material will eat your skin like a belt sander with 24 grit. But I managed to get a good cup, cup and a half, of crap out of there.
Still love the stove. Will build a locking swivel scraper so I can properly clean that spot in future. Definitely the Achilles heel of cleaning maintenance on this stove.
If you’re stove starts losing heat and smoking out the hopper and/or pre-heating chamber, check that 4” section above the burn basket! You may be really glad you did.
Using a rubber mallet, I gave that section percussive maintenance about every half hour for the first three hours after relighting.
After the first 45 minutes or so, the chimney temp started staying between 460 and 500, and pellet area stopped smoking.
As the temps outside have dropped into the low 20’s, the temps inside have climbed up to 70F and seem to be staying there.
Hopefully this did the trick and the casa will be warmer than 50F in the morning!
Update 12/7/2018
Installed the proper air intake after temperatures dropped to 11F.
Vacuuming out the entire burn chamber area and chimney after installing the air intake hose, I’m having good issues- issues keeping the inside cooler than 50F warmer than outside.
Still a one bag a day stove no matter what the outside temperature.
Important to keep the fly ash vacuumed out a few times a week.
Burn basket still looking good.
————
Pros:
Unit arrived in great shape.
Assembly was far easier than instruction manual. 2/3 of the assembly was already done (thermometer installed etc
For running continuous, I’ve found the following tricks.
Burn a bag or two of several different brands before stockpiling for winter. I found some brands either don’t feed because they’re too “sticky” (just won’t slide on their own), or there too long to feed well.
Before bed, and first thing in the morning:
Shake the burn chamber well (I use a rubber mallet and whack it on the sides).
Even out ash layer in ash tray.
Clean secondary burn chamber.
Empty ash tray.
Top off the hopper before going to sleep.
I pull burn chamber apart about once a week and vacuum the while thing, and pick off any residue on the burn basket.
Temps have been dipping in the mid 20’s F. Stove has kept the yurt in the high 60’s to around 73F.
On low burn I’ve been using about one bag of pellets every 24-30 hours.
Nice to know:
Burn off the new stove stink before putting in the place.
Use a chimney when burning off the stink, or you can’t get it hot enough.
Cons:
If you don’t even out the pellets when the hopper is nearly empty, the hopper will fill with smoke.
If you shut off pellets and let the stove burn off the last in the chamber while set for low temperatures, winds can blow the smoke inside.
Overall:
Awesome to have a warm yurt 24×7
If this keeps up and the burn basket survives the winter I’ll probably bump this up to 5 stars.
Amazon Customer –
Anyone purchasing this pellet stove I suggest you read my review in its entirety along with some other informative input from others to obtain the best results with this product.
I first started the stove with a propane torch per instructions and it fired up easily. (Be prepared for burn off smoke for roughly half an hour so either fire it outdoors or set fans strategically to exhaust.) The thermometer climbed to approximately 675 degrees and the unit gave off fairly comfortable heat. Before retiring I “opened” the draft slightly to slow down the burn rate. (This sounds counterintuitive for anyone used to a wood burner.) The next morning it appeared the fire was out but after inspection of the Primary Burn Tube there were still embers. I then removed the Secondary Burn Plate allowing ash to fall into the Ash Tray, poked the primary burn basket with a long screw driver and it was back up and running though not to the previous level. By the morning of the third day it was extinguished and we were sorely disappointed. Reading the User Manual under “Tuning Your Stove” I removed the primary burn basket and widened the gaps between the tubes (And I believe this is something which should definitely be emphasized). I cleaned the stove with a Shop Vac, though in hindsight do not believe it was entirely necessary, replaced all parts and fired it up. This time the temperature rose almost to the maximum of 900 degrees though I backed it off first. As I needed to leave for some time I lowered it further and upon return it was functioning perfectly. The following morning required some attention to return to a comfortable operating temperature. So, all in all, to this point I am pleased.
But I offer the following suggestions to attain the best performance:
1) If you do not find you have adequate draft try expanding the burn cage as described.
2) At any time you feel it is not burning to its optimum level begin by checking the ash tray then shake the burn tubes to dislodge any accumulated fly ash. (Anyone familiar with a coal furnace as I am having grown up with such can relate.) Fly ash tends to clump especially at the rear of the secondary burn plate and somewhat in the burn cage constricting draft.
3) Should this still fail to bring it up to speed take a long object (I had an old automobile antenna I use.) and remove the Air Cover on the front of the primary burn tube sliding it through the spaces in the burn cage. This has worked like a charm for me thus far.
I intend to follow these steps at least morning and evening as I feel it will prevent fly ash build up.
*Lastly and importantly in case anyone finds the same question, there is a part (stainless steel plate) I simply could not figure out what it was or where it went. Contacting Tech Support is simple for the most part especially as they have text support and respond almost instantaneously. I found the part is listed as the Pellet Slide (Pgs 18-19) and drops into the feed opening of the pellet hopper. Also, it is Step 4 under Main Body Assembly though could be better described.
I hope this provides assistance to anyone who is interested or has already purchased this unit. Also, there are numerous YouTube videos I suggest you view if possible. One is very negative though I cannot agree with their assessment.
Addendum: Since writing this I have discovered a couple more nuances. I mention using an old auto antenna which works for opening the burn basket, but I made a tool using 3/8″ steel rod bent at 90 degrees with approximately 1 1/2″ extended. This allows me to probe the cage top and bottom and dislodge any buildup from fly ash. Though you can fill with 60# of pellets the chute just isn’t efficient causing the pellets (sometimes) to burn back when unattended (overnight). I intend to make an auxiliary add-on chute adding capacity.